


StripCard Next.jswebsitedocumentation.
A complete, beginner-friendly guide to install, configure, and customize the StripCard Next.js website template for your virtual card, gift card, money transfer, and digital wallet business — no coding experience required.
Step 01
Welcome to StripCard
StripCard is a complete Virtual Card, Gift Card, Money Transfer, and Digital Wallet platform — featuring Buy Virtual Card, Virtual Card TopUp, Add Money, Withdraw, KYC Verification, 2FA Security, Biometric Login, Push Notifications, and Multi-Language support. This Next.js Website Template is the official frontend that connects directly to your existing StripCard Admin Panel — even if you are not a developer, you can set it up for your business in just a few minutes.
What you get with this template
Next.js Frontend
Built on modern Next.js architecture for fast page loads, scalability, and SEO.
Admin Panel Ready
Compatible out-of-the-box with your existing StripCard Admin Panel API.
Virtual Card & Wallet
Showcase Buy Virtual Card, TopUp, Add Money, Transfer, and Withdraw features beautifully.
SEO Friendly
Optimized structure and meta tags ready for Google search ranking.
Easy Branding
Change logo, business name, colors, and content with simple file edits.
KYC, 2FA & Biometric
Promote built-in security: KYC Verification, 2FA, Biometric Login, and Email Verification.
Step 02
Before You Start
You do not need to be a coding expert to run this template. Just make sure the following free software is installed on your computer.
No coding experience required
Required Software
| Software | Why You Need It | Download Link |
|---|---|---|
| VS Code | Free code editor used to view and modify files | Download → |
| Node.js (LTS) | JavaScript runtime required to run the project locally | Download → |
| Google Chrome | Recommended browser to preview your website | Download → |
Important: choose the LTS version
Step 03
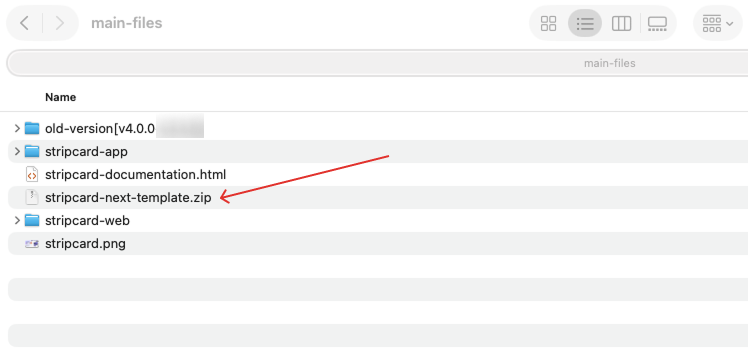
Project Folder Overview
After extracting the ZIP file you downloaded, you will see the following folder structure. Understanding what each folder contains makes customization much easier.
stripcard-next-template/
│
├── public/              # Images, logo, static files
├── src/                 # Main website source code
│   ├── components/      # Reusable website sections
│   ├── pages/           # Website pages
│   ├── assets/          # Logo, icons, graphics
│   ├── config/          # Site name, settings
│   └── data/            # Homepage text, content
│
├── package.json         # Project dependencies info
├── .env                 # API URL configuration
└── next.config.js       # Next.js settings
Important folders explained
| Folder / File | Purpose |
|---|---|
| public/ | Holds all images, logo, favicon, and static assets |
| src/ | Main source code — most customization happens here |
| src/components/ | Reusable sections like Header, Footer, Banner |
| src/pages/ | Page-level files: Home, About, Contact, etc. |
| src/config/ | Business name, contact info, and basic settings |
| src/data/ | Homepage text content, feature lists, and copy |
| .env | Admin panel API URL configuration (very important) |
Step 04
Opening Project in VS Code
Follow these steps to open the downloaded project inside VS Code.
- 01
Extract the downloaded ZIP file to a location like Desktop.
- 02
Open the VS Code application.
- 03
From the top menu, click File → Open Folder.
- 04
Select the extracted
stripcard-next-templatefolder. - 05
Click the “Open” button to load the project.
Pro tip
Step 05
Install Project Dependencies
Before you can run the project, you need to install the required packages. This only needs to be done once.
Open the terminal
In VS Code, click Terminal → New Terminal from the top menu. A terminal window will open at the bottom.
Run the install command
Paste the following command into the terminal and press Enter:
npm install
This may take a few minutes
How to confirm success
added XXX packages, the installation has finished successfully.Step 06
Run the Project
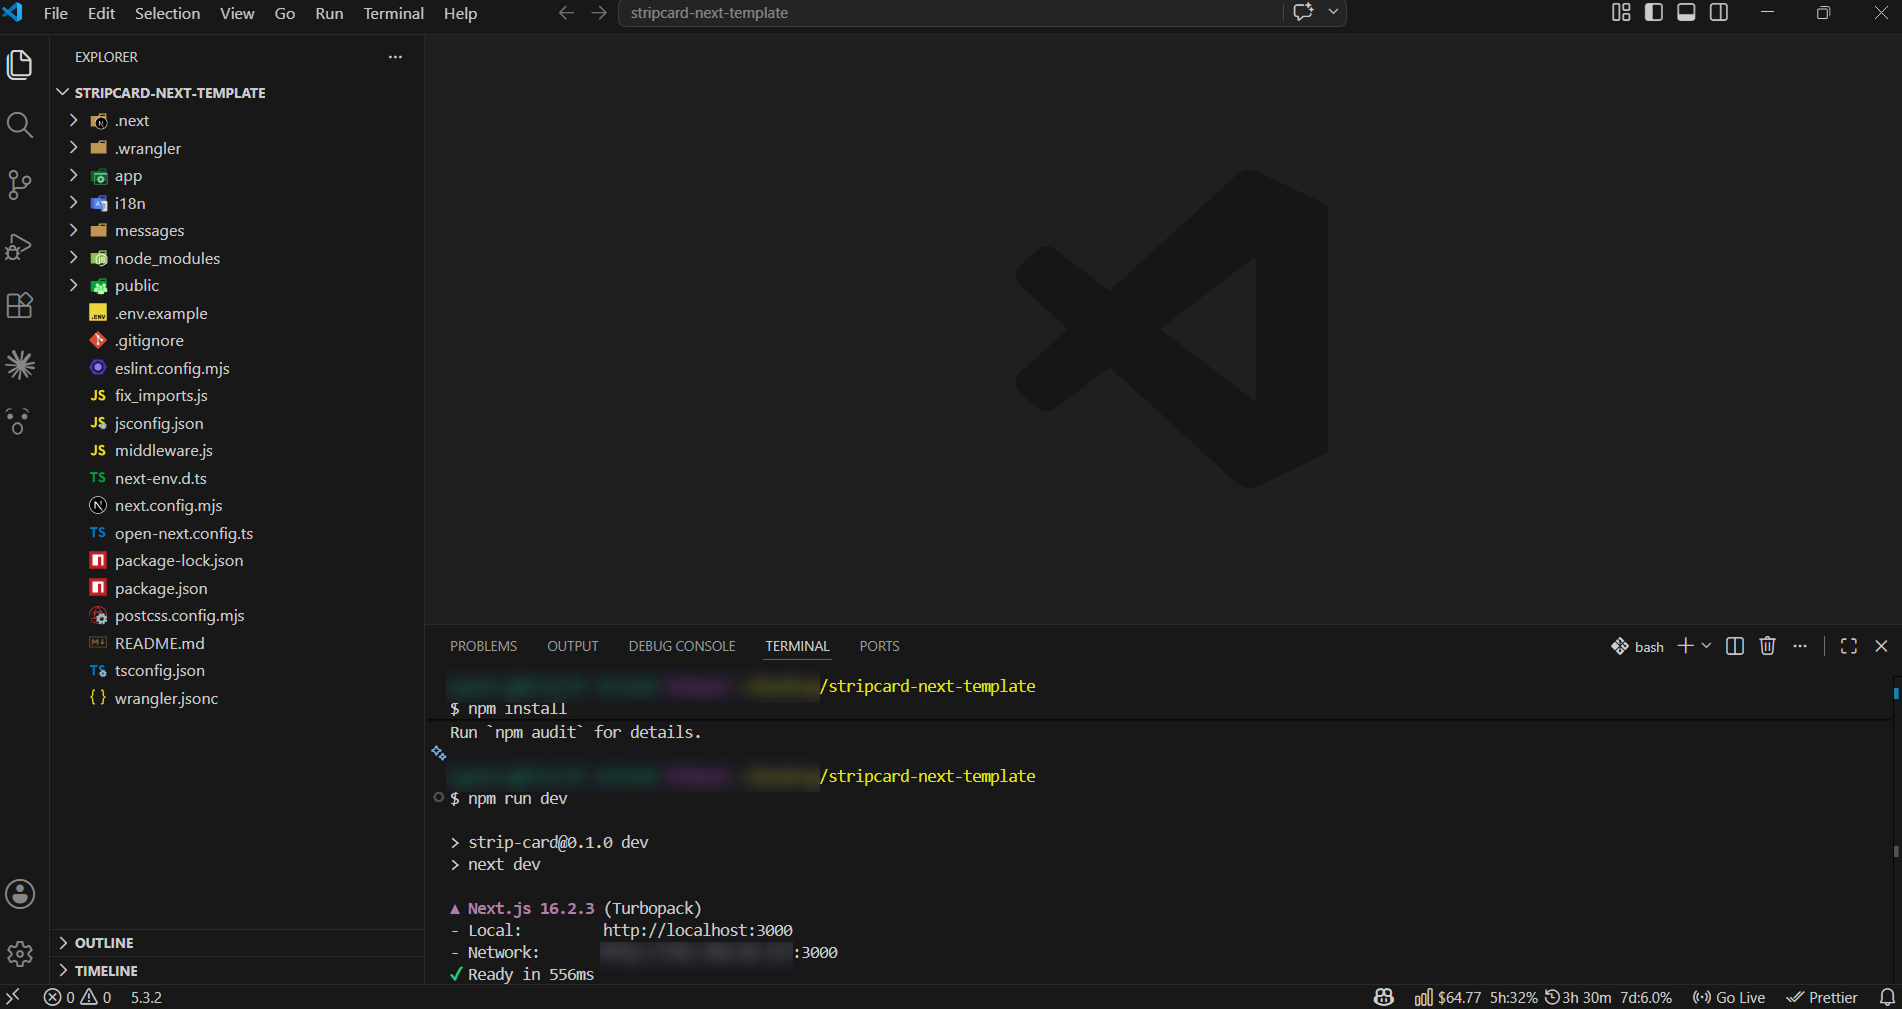
Once installation is complete, it is time to run the project locally. Paste the following command into the terminal:
npm run dev
After a few seconds, the terminal will display a message like:
✓ Ready in 2.3s
- Local: http://localhost:3000
Now open your browser and go to:
http://localhost:3000
Your website is live!
Do not close the terminal
Step 07
Change Website Logo
Replace the default logo with your own business logo by following the steps below.
Logo location
In the VS Code file explorer, navigate to the following folder:
public/logo/
Replace steps
- 01
Open the
public/logo/folder. - 02
You will see the existing logo file (e.g.
logo.png). - 03
Save your own logo with the same file name (logo.png) and replace it.
- 04
Refresh the browser — your new logo will appear instantly.
Recommended logo size
Step 08
Change Business Name
Replace every occurrence of “StripCard” across the website with your own business name in one place.
Configuration file
src/app/[locale]/page.js
Edit steps
- 01
Open
src/app/[locale]/page.jsin VS Code. - 02
Find the lines shown below.
- 03
Replace “StripCard” with your own business name.
- 04
Save the file (Ctrl + S or Cmd + S).
Before
metadata{
title: "StripCard — Virtual Card, Gift Card & Digital Wallet",
description: "Buy Virtual Cards, top up balance, send money, withdraw funds, and purchase gift cards — all secured with KYC, 2FA, and biometric login.",
keywords: "virtual card, virtual card topup, gift card, add money, money transfer, withdraw, digital wallet, kyc, 2fa, biometric login",
}
After (example)
metadata{
title: "Your Business Name — Virtual Card & Wallet",
description: "Your business tagline goes here",
keywords: "your, business, keywords",
}
Be careful with syntax
") or commas (,). Only change the text between the quotes.Step 09
Change Website Content
Customize the homepage banner text, about section, feature list, and footer information from a single, organized location.
Content files location
src/app/[locale]/page.js
Inside this folder you will find several content files:
| File Name | What It Contains |
|---|---|
| Banner.js | Hero section heading, subtitle, CTA buttons, and banner content |
| SecurityFeatures.js | KYC Verification, 2FA, Biometric Login, and Email Verification cards |
| FeaturesSection.js | Buy Virtual Card, TopUp, Add Money, Transfer, Withdraw, Gift Card highlights |
| Download.js | App download section, footer links, contact info, and copyright text |
Example: hero banner edit
src/messages/en.json
Before
title: "Buy Virtual Card Today",
subtitle: "Get your Virtual Card today and enjoy the ease of using it for online shopping, gaming, or your favorite subscriptions.",
buttonText: "Get Started",
After (custom)
title: "Your Virtual Card, Wallet & Gift Card Solution",
subtitle: "Easy TopUp, instant Money Transfer, secure Withdraw, and digital Gift Cards — protected by KYC, 2FA, and Biometric Login.",
buttonText: "Start Now",
Multi-language ready
Step 10
Change Images & Graphics
Update banner images, feature icons, and section graphics to match your own brand identity.
Images folder location
public/images/
Replace process
- 01
Navigate to the
public/images/folder. - 02
Note the file name of the image you want to change.
- 03
Save your new image using exactly the same file name.
- 04
Delete or rename the old image, then paste the new image in.
- 05
Refresh the browser to see the new image.
Image guidelines
Keep the same Name
Match the original Name other ways not working .
Keep the same size
Match the original width × height to keep the layout intact across pages.
Preferred format
Use PNG or WebP — they offer great quality with a smaller file size.
File size
Aim for under 500 KB per image to keep your website loading fast.
Step 11
Configure Admin Panel API
Most important section
The StripCard Next.js website fetches data from your existing StripCard Admin Panel through its API. You need to point the website to the correct API URL.
Configuration file
.env
Can't find the .env file?
.env.example. Copy it and rename the copy to .env.Edit steps
- 01
Open the
.envfile in VS Code. - 02
Find the API URL line shown below.
- 03
Replace the example URL with your admin panel domain (including https://).
- 04
Save the file.
- 05
In the terminal, press
Ctrl + Cto stop the server, then runnpm run devagain.
Example configuration
NEXT_PUBLIC_API_URL=https://yourdomain.com/api
NEXT_PUBLIC_SITE_URL=https://yourdomain.com
URL format matters
https://yourdomain.com/api❌ Wrong: yourdomain.com/api (missing https://)❌ Wrong: https://yourdomain.com/api/ (trailing slash)Step 12
Connect Existing Admin Panel
If you already have a StripCard Admin Panel installed, this website will connect to it directly and pull live data.
How it works
Admin Panel
Your data, transactions, and users are stored on the backend.
API Connection
The URL in .env tells the website where to fetch live data from.
Website Display
Your customers see real-time content rendered from the backend.
Example setup
| Component | Example URL |
|---|---|
| Admin Panel | https://yourdomain.com |
| API Endpoint | https://yourdomain.com/api |
| Website (Live) | https://www.yourdomain.com |
Connection test
Step 13
SEO & Website Settings
Configure browser tab title, favicon, and meta description so your website appears correctly in Google search results.
SEO configuration file
src/config/seo.js
Editable fields
title: "Your Business — Virtual Card, Wallet & Gift Card",
description: "Buy Virtual Card, TopUp, Add Money, Transfer, Withdraw, and purchase Gift Cards — with KYC, 2FA, and Biometric Login.",
keywords: "virtual card, virtual card topup, gift card, add money, money transfer, withdraw, digital wallet, kyc verification, 2fa security, biometric login, push notification, multi-language",
ogImage: "/images/og-image.png",
Change the favicon
To change the browser tab icon (favicon):
- 01
Go to the
public/folder. - 02
Replace the
favicon.icofile (32×32 or 64×64 pixels). - 03
Clear browser cache and refresh the page.
Favicon generator
Step 14
Common Beginner Mistakes
The most frequent mistakes new users make — and how to avoid them.
Skipping npm install
npm install before running the project for the very first time.Wrong API URL
https:// or a trailing slash in the .env file will break the API connection.Wrong logo dimensions
Deleting important files
package.json or the node_modules/ folder by accident.Stale browser cache
Ctrl + Shift + R.Removing quotes or commas
" or , while editing config files will cause syntax errors.Step 15
Troubleshooting Guide
Solutions to the most common problems you may run into during setup.
Problem: white screen or blank page
Open the browser console (press F12).
Check the Console tab for any error messages.
In the terminal, press
Ctrl + Cand runnpm run devagain.
Problem: “npm command not found”
Node.js is not installed, or the installation did not complete properly.
Download the LTS version from nodejs.org.
Restart your computer after installation completes.
Run
node -vin the terminal to verify the version.
Problem: website not loading
Check that the terminal shows a “Ready” message.
Verify the URL:
http://localhost:3000.Make sure no other program is using port 3000.
Problem: API not connecting
Verify the API URL inside your
.envfile.Open the admin panel domain in a browser and confirm it works.
Always restart the dev server after editing
.env.Using HTTP instead of HTTPS may block the connection.
Problem: images not changing
Confirm the file name matches the original exactly.
Clear browser cache (
Ctrl + Shift + Delete).Do a hard refresh (
Ctrl + Shift + R).
Still not working?
Step 16
Support & Assistance
Our team is here to help. If you run into any issue, contact us through one of the channels below.
Support channels
Sales Support
Questions about purchase, license, or pricing
Technical Support
Installation, customization, and troubleshooting help
What to include in your support request
For the fastest possible response, please share the following:
| Item | Why It Helps |
|---|---|
| Screenshot | Helps us visually understand your issue |
| Error message | Copy the full error text from terminal or browser |
| Browser console | Screenshot of F12 → Console tab |
| Hosting details | Server type, domain, and admin panel URL |
| Purchase code | Your CodeCanyon license code |